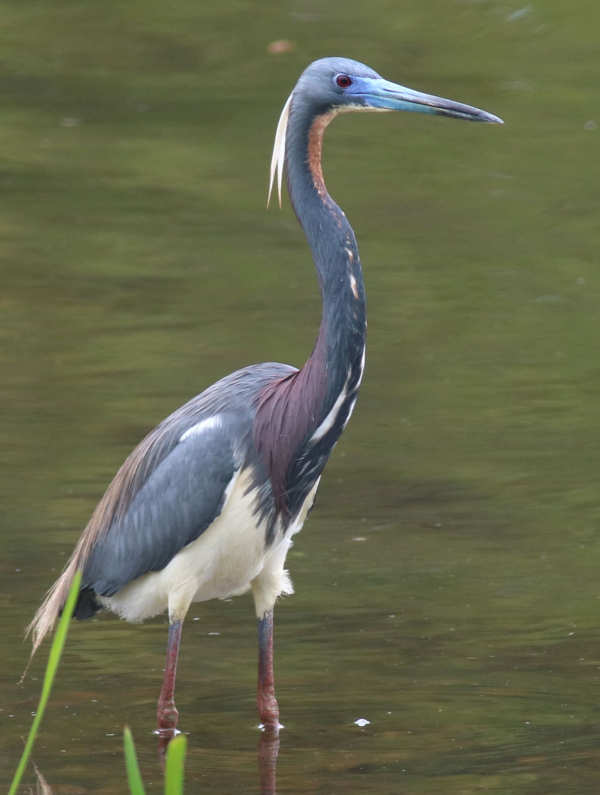
A standard portrait of a wading bird is made more impressive by the contrasting colors, facial coloring, and the plumes on this Tricolored Heron’s head and back.
|
Tall wading birds – herons, egrets, bitterns, ibis, spoonbills, storks, and cranes – are among the most popular birds for birders – and for everyone. They are large and fairly obvious, attracting our attention wherever we encounter them. They have long necks, long legs, long bills, long wings; and in flight wading birds are most impressive – singularly and in flocks. As photographers, we are always hopeful of photographing wading birds to show their majesty, to document them catching prey, and to show them in the throes of mating displays in advance of the nesting season.
As winter melts into spring along the shallows of wetlands adjacent to the warmer areas of the Atlantic, Gulf, and Pacific coasts, bright colors are flushing bare skin on the face of many species of wading birds, with deeper colors accenting their legs and bill, while some species grow feather plumes on their head, throat, back, or breast, providing ever-more impressive birds to photograph. As spring progresses, the wading bird progression will anchor the migration north with camera-toting birders intercepting their flight paths and stopover sites.
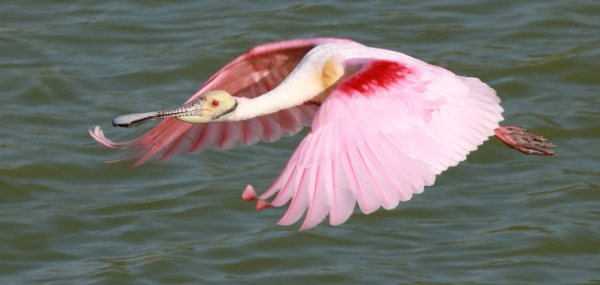
Wading birds are large, they are impressive, and they provide a variety of photo opportunities for us. As birders, wading birds are among the first birds we hope to photograph – Great Blue Herons, Great Egrets, Sandhill Cranes – and we eventually seek out Wood Storks, Roseate Spoonbills, and Yellow-crowned Night Herons – then we try to photograph all the wading birds! So we make it a point to seek them out, visit locations where we hope to find them, and we marvel as we photograph each one.
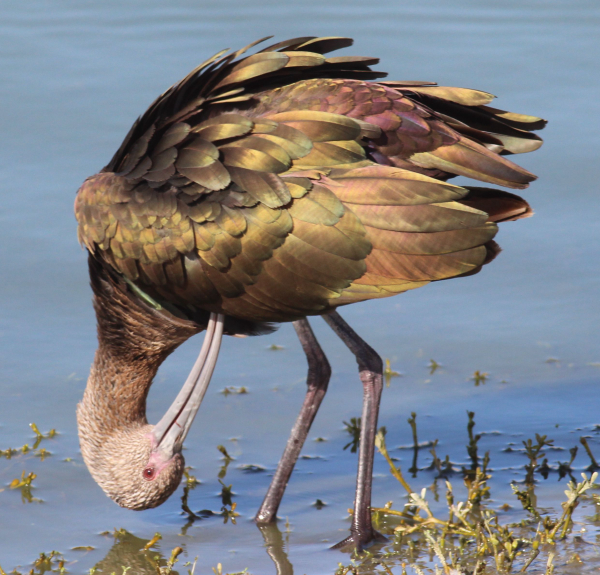
The remarkable iridescent plumage of this White-faced Ibis is enhanced by perfect afternoon sunlight and its ruffled feathers as it preens in an unusual position, surrounded by a simple waterside setting.
|
Because many wading birds are among the largest birds we encounter, they are a good group to start with as beginning photographers, but ultimately, we never get enough photos of wading birds. There are always more opportunities, in different settings, under different lighting conditions, with the birds engaged in an array of activities. Wading birds as a group are just plain exciting to behold and to photograph.
Locations – Wading birds are usually associated with water – the shorelines of shallow ponds and marshes, tidal flats, and lake shores – these are the primary habitats to visit regularly to photograph wading birds.
Timing – Pick the time of your visits for the best possible lighting – mornings before 11:00 and afternoons after 2:00 are best now. As the spring season progresses and we adjust to the daylight savings change of time, we will need to adjust the periods we devote to photogrphing.
Sunlight – The need for good sunlight originating from behind you is essential to capture the best colors on all wading birds, and that’s especially true with birds that have any iridescent plumage. In addition to providing more vivid colors, sunlight provides more contrast between colors and shades of colors too.
Shadows – Sunlight also produces shadows, so always be aware of shadowing on one side of the bird. After taking an initial photo, you may want to move to avoid shadowing. I also like to refer to my own shadow when positioning myself, so try to position directly between the bird and the sun – that’s when my shadow is pointing directly at the bird.
Overcast Conditions – When it’s overcast, my best suggestion is re-schedule for a sunny period. I find something else to do during cloudy conditions; the quality of any resulting photos will have muted colors, low contrast, and dull surroundings. You can use the effort as practice, or for behavioral observations, but any photos you take will be subpar.
Water Reflections – Blue sky sunlight produces blue-colored water, which provides a great setting for wading birds. At the same time, wading birds are the prime interest and whether the water color is blue, green, brown, or gray is less important. Water has unlimited variations produced by calm or variations of windy conditions, water flows, or waves. While you are focusing on the bird, try to be aware of the water and its movements for enhanced photo quality. At times, when the water is clam, you may be able to take photos with the bird reflected in the water in front of it.
Vegetation – Plants in your setting can be a welcome addition to add some contrasting green, yellow, or tan coloration while showing the bit of habitat. In some cases plants may not be welcome if they hide parts of bird in a distracting manner. Either way, be aware of your background and foreground and, if necessary, reposition to get a better background after taking a couple initial photos. Or you may be able to simply wait for the bird to move to a better location. As with any composition, take the photos you can and try to improve on them if possible.
Positioning – When photographing, try to take some images from a low position – kneeling, squatting, sitting, or lying on the ground – to get closer to water level or ground level, and thereby closer to the level of the bird.
Stabilizing – When you are getting low, or while standing, try to stabilize your camera in the best possible way. Always hold your breath when you are pressing the shutter button to help stabilize your camera and lens. Also do your best to stabilize yourself while holding your camera by bracing your elbows against your chest when standing or bracing one elbow against a knee while kneeling. If you can brace your lens against a tree, pole, fence, or something else, that will help too.
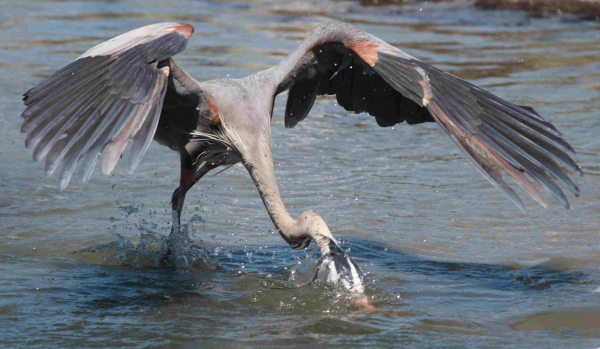
Action – After taking initial photos, wait to see what happens next; wait for the Action. Perhaps the bird will try to catch a fish; perhaps it will take a few steps as it hunts, providing another angle for you to photograph; or maybe it will decide to take flight to reposition to a new hunting area. Spend a little extra time with a photo subject, and you will often be rewarded with another, possibly better photo opportunity. Also try to anticipate the birds’ next moves, rather than react to their movements a step behind the action. Action photos are always the most interesting and most revealing.
Flight Photos – Your best bet for getting multiple opportunities to photograph wading birds in flight will come when you can find a flight path the birds follow between feeding areas and nest sites. Then it’s a matter of spending some time in position and watching for birds you can focus on and follow through your lens, taking multiple photographs of each bird in flight if possible.
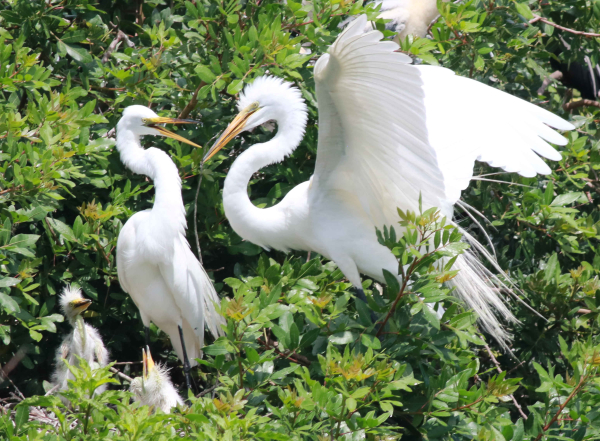
Photographing nesting birds is always a question of photo ethics, but this photo was taken at a nesting rookery where there was a blind provided for photographers and the birds were not affected. The chance to take an action photo with a level of interaction between the birds at their nest was a product of good timing, although the lighting was a bit harsh on the white plumage of the Great Egrets.
|
Your Approach – Do your best to keep from alarming a bird as you approach it, especially if they are feeding – the birds always come first. By not getting too close you will allow birds to behave naturally and provide the best photos as a result. If a bird becomes aware of your approach, stop and wait for it to relax after a few minutes; sometimes when you stop short of a bird it may even move closer in your direction. If you try to approach a bird, keep a low profile, move slowly, and don’t walk directly at the bird; instead, move at an angle to the bird that gets you ever-closer, slowly zig-zagging if necessary.
Cropping – When reviewing the photos you’ve taken, some simple cropping of images can make a big difference in the quality of your final images. A simple crop to remove extraneous background area will enlarge the bird within the photo frame, and it’s always best to try not to center your subject. Instead, leave a little extra space in front of the bird and your photo will benefit from the improvement.
If you live in the northern realm, it's a good time to make a plan for the return of wading birds, and if you live in the southern realm, you may be surrounded by wading bird photo opportunities. March is a great time to begin your search for wading birds and the weeks ahead should provide a variety of species for you to photograph – hunting, feeding, preening, displaying, flying, and more. Waders will really become active during May and June as they begin nest building at rookeries, and the variety of wading birds should keep your attention through the summer months. There’s a great wading bird photo season ahead, so embrace this exceptional group of photo subjects as often as you can, and Good Luck!
Article and photographs by Paul Konrad
Share your bird photos and birding experiences at editorstbw2@gmail.com