
You probably already know that not all Red-tailed Hawks have red tails. Red-tailed Hawks are one of the most highly variable raptors so far as their plumage, which may be affected by their geographic range, genetics of regional populations, and morphology including black morphs, partial albinos, and Harlan’s and Krider’s Red-tails. But most obvious of all, during their first-year of life no Red-tailed Hawks have red or red-orange tails. From fledging to their second summer or fall, Red-tailed Hawks have tan-colored tail feathers that are molted as they grow new “red” tail feathers (retrices).
As I noted about a month ago, each summer and fall I get a big kick out of seeing yearling Red-tailed Hawks that are in the midst of molting the tan tail feathers of their first year as they grow bright new orange-red tail feathers. When lucky, you will even see a molting yearling Red-tail with some loose tan feathers blowing in the wind as they take flight and spread their in-molt tail. With limited success I’ve tried many times to get good photos of these yearlings that show a mix of old tan and new red tail feathers. Well, it turned out that Sunday evening, with super-windy conditions I found just such a yearling Red-tail.
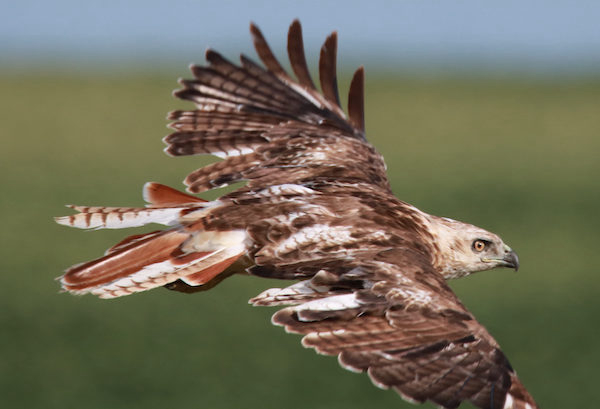
With its back to the strong west wind, a Red-tail was standing low on big round hay bale positioned on the edge of a shallow marsh filled with molting ducks and a few sandpipers. At first I didn’t know it was a yearling; I thought it might be a Krider’s Red-tail because it looked like it had a white head, and eventually I could see what appeared to be uniformly colored red-orange tail feathers as I photographed it from behind.
When the hawk decided to take flight though, banking generally in my direction, its tail was an obvious bit of a mess with its mix of loose tan feathers and new red-orange tail feathers of varied lengths. I still had my camera focused on the hawk and followed it through my viewfinder in flight, taking a couple documentary photos that are better than others I’ve attempted. In the first photo I can count 8 growing red tail feathers and 4 tan tail feathers yet to fall. Some of the new feathers are just beginning to erupt from the base of the tail, while the 2 central feathers are nearly full length.
The tail was in terrible shape, but so were the wings, with many obvious missing feathers and showing a few new darker-colored replacement feathers. This hawk was obviously in the midst of its yearling molt, with feathers missing from its head, body, wings – and tail.
Lightning Strikes Twice
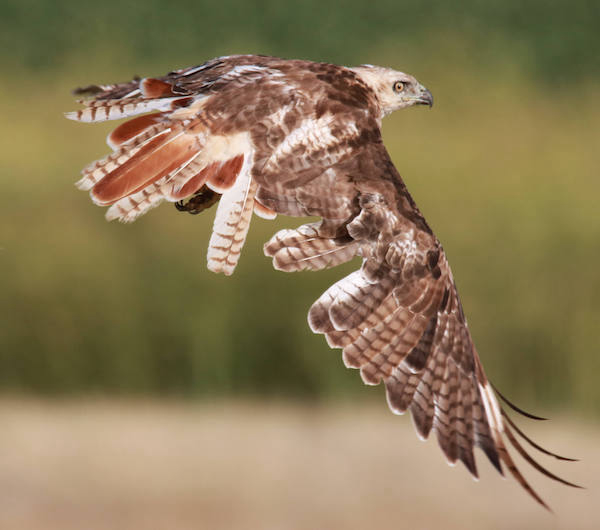
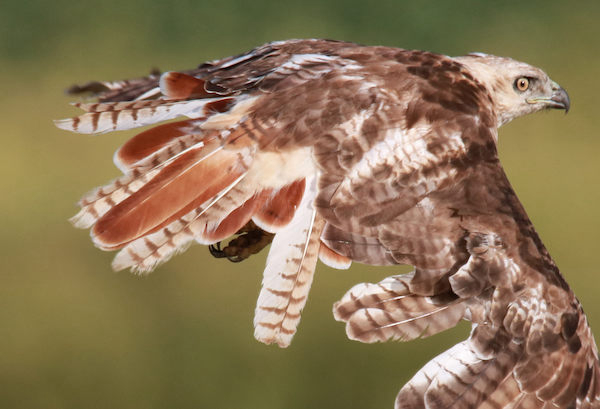
Would you believe that 2 miles down the road I found and photographed another even rattier-looking molting yearling Red-tail? I did! How lucky and how fun, in spite of the strong wind that kept most raptors seeking shelter. This yearling was paler, probably just more sun-bleached, and its new adult tail feathers were just beginning to show, although a magnified look at the tail on computer show that 6 retrices were beginning to replace year-old tan tail feathers.
Neither of the birds was very attractive but in this case, it was a matter of documenting their molt, especially the molt of their tail feathers, which is so interesting to observe in the field. The second photo is a poor quality image photographically, but as a documentary photo I was lucky to be able to take and share “snapshots” of the progress of the molt of these young hawks’ tail feathers, a photo quest I’ve been after for years – make that decades.
The Situation & Settings
As for photo information that I can pass along, I was driving on an east-west road with the sun behind me and both the hawks positioned to my right side. Luckily, the wind was such that the hawks took off into the wind, flying broadside past me as each one flew westward. My camera was pre-set at the usual ISO of 400. The aperture was at f7, which provides a wide enough area to get all the bird in focus, while providing a fast shutter speed of 1/1250 of a second, fast enough to stop most action. I never use an automatic camera setting, but I find the Av setting, which uses the f-stop you select to balance the corresponding shutter speed is the best option.
The above settings are my usual pre-set camera settings when I’m photographing birds; then if I have the opportunity to improve on that combination of settings under given conditions, I follow through. I also had my camera’s ‘drive mode’ dialed to continuous shooting, which allows me to take up to 5 photos per second (some cameras can take up to twice that number of photos per second). I zoomed the Tamron zoom lens to 600mm, at which the autofocus worked well for the first hawk’s photos. That hawk may also have been slowed down a bit by the strong west wind. The difference in the photo quality between the first and second yearlings was probably due to the added distance away from me, which was 40 feet versus 140 feet.
Documentary Photos

Five new tail feathers are just beginning to erupt from the tail of this sun-bleached yearling Red-tailed Hawk, documenting another example of the first molt of this raptor species.
|
While we all try to take the best possible photos of every bird, there is a lot to be said for the value of documentary photos. In my mind, every birder should use a camera in the field, in addition to their binoculars and field guide. Even if it’s just a matter of photographing the bird to remind you of a given day in the field, taking a photograph can be a very important tool for all birders. Time and time again, I find the importance of being able to review photos magnified on a computer screen where I see things that are difficult to see in the field, especially with moving or flying birds.
Certainly, a camera is a great tool to use when teaching others, and learning new things for yourself. Plus, photographing birds is downright fun! It adds another dimension to birding, a visual dimension that you can easily share with others in a variety of ways. And if you only take documentary photos, you will be a better birder for the effort. But there is no question that you will soon be taking high-grade images of the birds you encounter – and you will improve week to week, year to year. Digital photography and photo editing provide great opportunities for everyone to add to our appreciation and understanding of the birds around us. Enjoy the journey!
Article and photographs by Paul Konrad
Share your bird photos and birding experiences at editorstbw2@gmail.com